Accurate heart-rate data is critical for Morpheus — especially for recovery tracking and zone-based training. Many support requests and product returns happen because people think their strap isn’t working… when it’s actually just not being used correctly.
This guide walks you through setup, wearing, care, and troubleshooting so you get reliable data every time.
1️⃣ Why Chest Straps Matter
Compared with wrist or optical sensors, chest straps measure your heart’s electrical signals directly, just like an ECG. This means:
✔ Extremely accurate heart rate data
✔ Immediate response during intervals and sprints
✔ Usable at all intensities and speeds — even when wrist sensors lag or fail
That’s why Morpheus recommends chest straps (like the M7) for all types of training.
Learn more about chest strap HRMs vs optical sensors here:
https://support.trainwithmorpheus.com/support/solutions/articles/4000225960-why-a-chest-strap-hrm-will-always-be-more-accurate-than-an-optical-sensor
2️⃣ Proper Strap Placement (Most Common Mistake)
How you wear your chest strap is the #1 factor in accuracy.
✓ Placement
• Strap should sit just below your sternum (chest bone) — snug, stable, and not sliding.
• It should be directly on skin — not over clothing.
• For women, the strap can go under the bra band for comfort and correct positioning.
✓ Fit
• Not too loose: causes erratic heart-rate spikes or dropouts.
• Not too tight: restricts breathing or feels uncomfortable.
• A snug fit that doesn’t move during activity is ideal.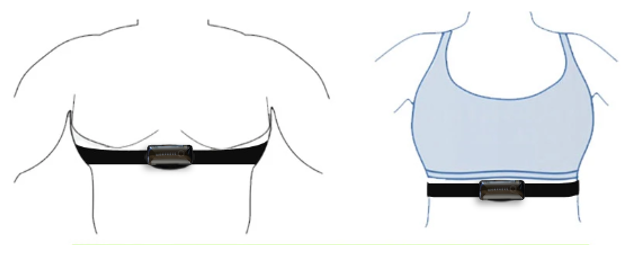
3️⃣ Moisture Is REQUIRED (Not Optional)
Chest straps work by detecting electrical signals from your heart. For a strong link between your skin and the electrodes:
Before Every use of the HRM:
✅ Put the strap on without the transmitter attached.
✅ Moisten the electrode areas (rub water or electrode gel on the inside contacts).
? Moisture dramatically improves signal quality, especially in cool or dry environments.
 Optional: moisten the outside of the strap to reduce static from clothing.
4️⃣ Transmitter Orientation & Connection
• When ready, fully snap the transmitter onto the strap, logo right-side up (Morpheus logo readable by someone facing you).

LED Light Guide (M7):
- White blinking — searching for heart rate
- Blue blinking (~10 seconds) — solid HR connection
- Lights off — active tracking continues quietly
If you have connection issues, see:
https://support.trainwithmorpheus.com/support/solutions/articles/4000226092-m7-troubleshooting-charging-connectivity-guide
5️⃣ Common User Errors That Cause “Bad Data”
Most “my strap is broken” emails trace back to one of these:
❌ Not Wetting the Electrodes
Dry electrodes = weak or inconsistent readings. Always moisten before training.
❌ Strap Too Loose or Too High
The signal will jump around if the strap slides. It needs firm skin contact.
❌ Wearing Over Clothing
The strap must be against your skin — fabric interferes with the electrical signal.
❌ Transmitter Orientation
If the transmitter is upside down or off-center, the data can be unreliable. Orientation matters.
If readings seem off, fix these first before assuming the device is faulty.
6️⃣ How to Care for Your Chest Strap
Proper care = longer life and better accuracy.
After Every Workout:
• Unclip the transmitter from the strap.
• Wipe sweat off the transmitter with a soft towel.
• Rinse the strap with warm water.
• Air-dry completely before storing.
Sweat contains salt and oils that can corrode connection points and block electrical contact. Regular rinsing removes this barrier.
Deep Cleaning (Monthly or If Data Gets Noisy):
Soak strap in warm water with mild dish soap.
Rinse thoroughly.
Air dry completely.
Avoid machine washing and never use a dryer — heat and agitation can damage the strap and electrodes.
Full cleaning guide:
https://support.trainwithmorpheus.com/support/solutions/articles/4000226090-caring-for-your-m7-daily-care-cleaning-guide
7️⃣ Straps Wear Out Over Time
Chest straps don’t last forever:
• The elastic wears
• Snap contacts corrode
• Accuracy degrades
If you’re washing and caring for it regularly but still see erratic data, it’s probably time for a replacement strap.
How to tell if your strap needs replacing:
https://support.trainwithmorpheus.com/support/solutions/articles/4000226091-heart-rate-monitor-straps-wear-out-here-s-how-to-tell
9️⃣ Quick Troubleshooting Checklist
Before contacting support:
✔ Strap tight and in correct location
✔ Electrodes wet
✔ Strap clean and dry before use
✔ Transmitter snapped on correctly
✔ Strap not worn out
✔ Battery charged and unit turns on
Still stuck? Reach out to us via email at support@trainwithmorpheus.com
The Bottom Line
Chest straps are extremely accurate — when used correctly.
Most issues come from:
• Poor skin contact
• Lack of moisture
• Dirty straps
• Worn-out bands
Follow this guide and your Morpheus HRM will give you the accurate, consistent data it was designed for — and help you avoid unnecessary frustration or returns.